
This integration enables import of booking from Booking.com Taxi Portal to EasyTaxiOffice system and it’s complete management from EasyTaxiOffice system. Improve how your company work by signing up with EasyTaxiOffice today.
To take advantage of this integration you need to be a part of the Booking.com Taxi Partner program in order to use it.
This service is provided by a third party company. We don’t take any responsibility for any changes in how this service operates or works. Any issue with this service you need to discuss directly to company which provide it.
Setup
- Join Booking.com Taxi Partner program. Please contact their support team to learn how to do so.
- Once you have an account with them you should get your own API Client ID and Client Secret keys.
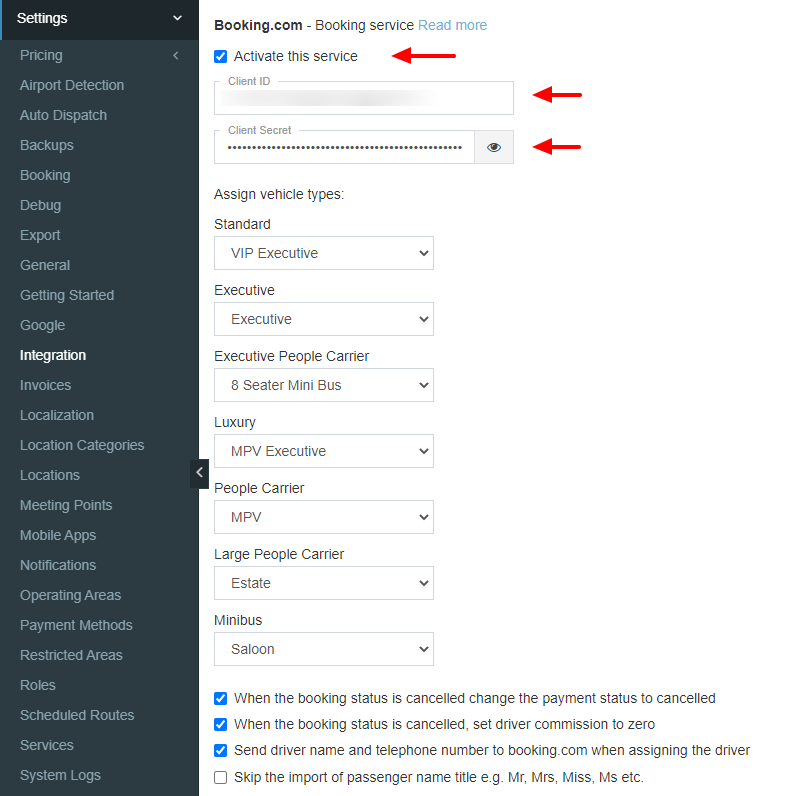
- Next login to the software admin panel and navigate to Settings > Integration > Booking.com tab.
- Update your Client ID and Client Secret keys, activate this service. Setup vehicle type mapping in “Assign vehicle types” section before you import any bookings if this is not done correctly then you will have to correct each booking manually later on. If needed adjust other available options and save all changes.
- When you are done with the integration please see this section below “How to manage imported booking?” to understand how it works.
- Please see attached screenshot below for more details.
How to manage imported booking?
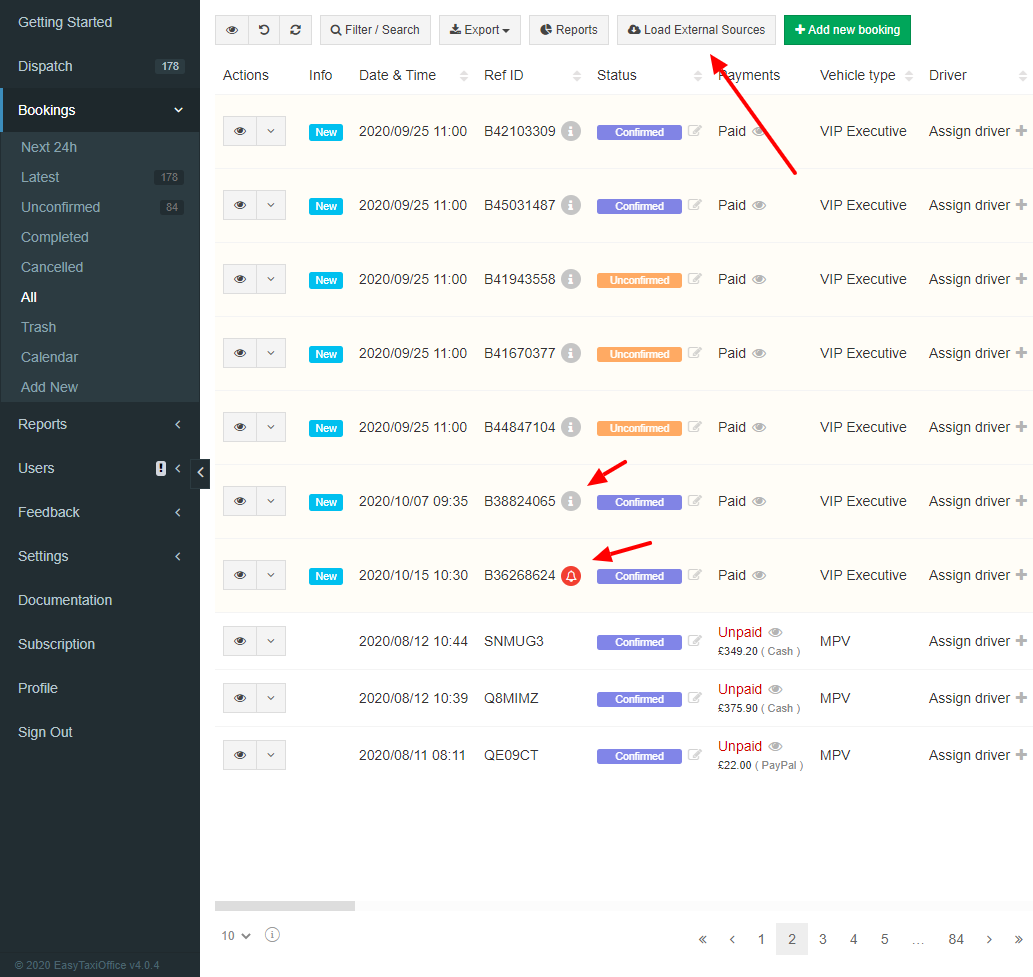
- Navigate to Bookings > All tab and click “Load external sources” button available at the very top of the screen. This option will import all bookings from your Booking.com Taxi Portal to EasyTaxiOffice software (ETO).
- All imported bookings will have a reference number in ETO starting with the letter “B” plus the Booking.com reference number (LEG ID). Example B30493476.
- As per Booking.com guidelines only one panel should be used at a given time to manage bookings that is either ETO or Taxi Portal. For example if you accept a booking using Taxi Portal panel the API will show it as NEW and the other way around.
- When you get a new booking it will have status Unconfirmed if you change the status to Confirmed or Assigned it will automatically confirm the booking in Booking.com Taxi Portal.
- When you cancel the booking in ETO it will also cancel it in the Booking.com Taxi Portal.
- When Booking.com cancels the booking it will also cancel it in ETO.
- Please note the Booking.com does not automatically inform ETO about changes to the bookings so it is important to click the “Load external sources” button every so on so the system can import new bookings and update existing ones.
- When Booking.com status is set to PENDING AMENDMENT you will see additional button next to the ref number called “Review“. This button will open a popup where you can see all changes that were made to the booking since last import and action on them, Accept or Reject it.
- When Booking.com status is set to PENDING CANCELLATION you will see a red warning icon next to the booking ref number. To let Booking.com know that you have seen it and to confirm the cancellation you need to change ETO booking status to “Cancelled“.
- Please note that Booking.com API do not send price breakdown and all charges are included in total price.
- When a booking is deleted from the ETO panel it does not remove the booking in Booking.com Taxi Portal.
- Please see attached screenshot below for more details.
Status Management
Keeping Everyone Informed.
Understanding Booking Statuses
Our system displays two statuses for Booking.com bookings within the "Status" column. These statuses represent the current booking state in EasyTaxiOffice (Internal) and Booking.com (External). Maintaining alignment between these statuses is crucial for transparency and efficient booking management.
Why Separate Statuses?
EasyTaxiOffice and Booking.com operate independently with distinct booking lifecycles and workflows. By displaying both internal and external statuses, you gain a comprehensive view of the booking's progress across both platforms.
Benefits of Status Alignment
- Improved Communication: Ensures all parties involved (driver, customer, dispatcher) are aware of the booking's current stage on both platforms.
- Reduced Errors: Minimizes confusion and potential errors that might arise due to discrepancies in status information.
- Streamlined Operations: Facilitates smoother workflow by providing clear visibility into the booking process across EasyTaxiOffice and Booking.com.
Maintaining Alignment
While our system offers flexibility in managing booking statuses, it's essential to follow the specific sequence required by Booking.com to ensure smooth data exchange through their API. A dedicated "External Status" pop-up will guide you through the status update process, helping you maintain consistency and avoid potential errors.
Internal Status
This reflects the current stage of the booking within your EasyTaxiOffice dispatch system.
External Status
This indicates the current booking status on Booking.com.
- New: A new booking has been created by a customer and is yet to be accepted by the assigned supply partner.
- When accepted, the external booking will transition to Accepted.
- When rejected, the external booking will be declined. - Accepted: The booking has been accepted by the supply partner.
- When rejected, the external booking will transition to Cancelled. - Driver assigned: A driver has been assigned to the booking by the supply partner.
- When rejected, the external booking will transition to Cancelled. - Pending amendment: Indicates the customer has amended the booking which should be accepted or rejected.
- When accepted, the external booking will revert to it's prior status (either Accepted or Driver assigned).
- When rejected, the external booking will transition to Cancelled. - Pending cancellation: Indicates a customer cancellation, the cancellation should be accepted.
- When accepted, the external booking will transition to Cancelled. - Cancelled: Indicates the booking has been either cancelled by the customer or rejected by the supply partner.
- Complete: Indicates the booking has been completed, active bookings will be automatically transitioned to this status 6 hours after pickup time.
Driver Assignment
Booking.com has implemented some changes regarding driver assignment through their API. This update requires more comprehensive driver details for assignment, including driver name, phone number, photo, and vehicle details. Ensure all this information is complete and up-to-date for your drivers to be assignable through Booking.com.
Our system offers more flexibility in status changes compared to Booking.com's strict sequence. Deviating from their required order will lead to API rejection. For instance, driver assignment is only possible when Booking.com status is Accepted or Driver assigned.
To help navigate these changes, we've introduced a dedicated "Booking.com Status" within the booking status column. This allows you to view the current Booking.com status and update it accordingly. A new "Booking.com Status" pop-up also guides you through the status change process, ensuring you follow the correct order and prevent errors during driver assignment. To open the pop-up, click on the status that appears on the right side in the status column, within the booking listing tab.
Driver Live Tracking
- Go to the Admin Panel.
- Navigate to Settings > Integration.
- Locate the Booking.com section.
- Find the Send the driver's last known position option and enable it.
- Click Save to confirm.
Data Synchronization
There are two methods available for syncing data:
Manual
This is useful when you need to update data immediately. Here's how to do it:
- Go to the Admin Panel.
- Navigate to Bookings > All.
- Click the Sync Source button.
- Choose Booking.com from the list.
- Select your preferred refresh timeframe.
- Initiate the process by clicking Sync.
Automatic
This option continuously updates booking information in the background, ensuring both systems reflect the latest details. Here's how to enable it:
- Go to the Admin Panel.
- Navigate to Settings > Integration.
- Locate the Booking.com section.
- Find the Automatic Data Refresh option.
- Select your preferred refresh timeframe.
- Click Save to confirm.
Choosing the Right Refresh Option
The recommended refresh option is Balanced, which provides a good balance between update speed and data coverage. However, you can choose from other options based on your specific needs:
- Balanced (default): The fastest updates.
• 48 hours before the pickup, every 15 minutes
• 1 week before the pickup, every 1 hour
• 1 month before the pickup, every 4 hours
• 3 months before the pickup, every 24 hours - Shorter timeframe: Faster updates, but with less historical data.
- Longer timeframe: Slower updates, but more historical data.
- Everything: Slowest, but includes all available data. This option may cause performance issues due to the large amount of data being processed continuously. Use with caution.
- Custom (manual only): Define a specific timeframe.
FAQs
Q: I see this error message "invalid_client" when syncing source, what to do?
A: This error message pops up when the API credentials you've entered in Settings > Integration > Booking.com are incorrect. Double-check that you're using the Production API credentials instead of Sandbox.
To obtain the correct "Production" API keys, you'll need to contact the Booking.com support team. They will guide you through the process of acquiring the necessary credentials.