How to set up Stripe payment method?

This service is provided by a third party company. We don’t take any responsibility for any changes in how this service operates or works. Any issue with this service you need to take directly to Stripe team.

How to integrate Stripe?


1. Register new Stripe account or login to your existing one.
2. Copy API keys from Stripe settings page: Live publishable key and Live secret key and paste it to Software -> Settings -> Payment Method -> Stripe Payment -> paste API keys -> click Active -> Save

a) Stripe account API tab.

b) Software Stripe payment method tab.

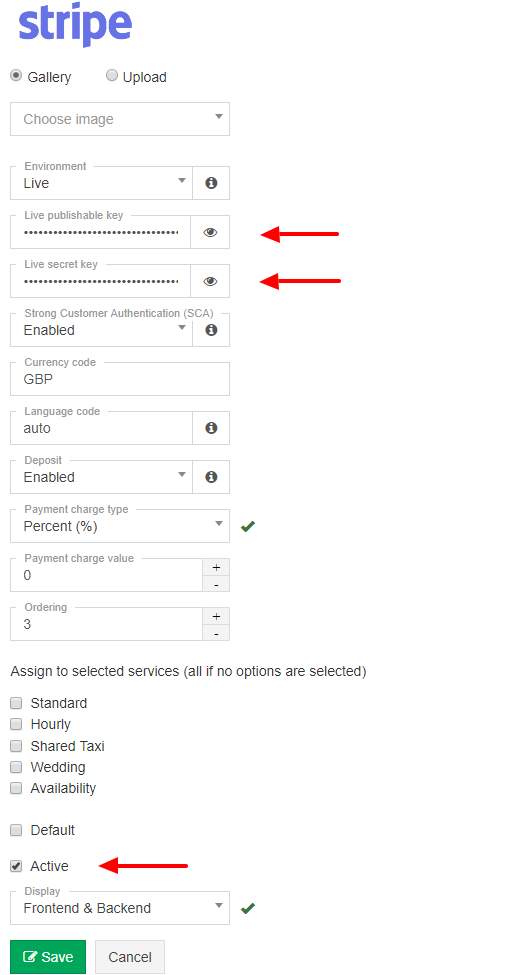
Important! An API key that contains dots, e.g. "sk_live_..." is incomplete and the integration will not work. Please note that by default Stripe only displays the full API key when creating it, and after closing the create window it is only partially displayed. In order to receive a full "Live secret key", a new one must be generated and then entered in the ETO account settings.

Important! The way Stripe is processing payments is changing. To continue taking payments via a widget on your website it is absolutely vital that you have a valid SSL certificate (https) on your website. If you do not have https in your website URL, then you do not have an SSL Certificate, and need to obtain one in order to keep using the EasyTaxiOffice. Contact your server provider in order to do so.

Important! Strong Customer Authentication (SCA), a new rule coming into effect on September 14, 2019, as part of PSD2 regulation in Europe, will require changes to how your European customers authenticate online payments. Card payments will require a different user experience, namely 3D Secure, in order to meet SCA requirements. Transactions that don’t follow the new authentication guidelines may be declined by your customers’ banks. Read more

To activate SCA go to Settings -> Payment methods -> Stripe and enable “Strong Customer Authentication (SCA)” option.

The Webhook is needed to receive payment transaction notifications from Stripe. To learn how to set it up please read "Webhook" section below.


Stripe Integration Options

This section explains the configuration options available for the Stripe payment method, providing flexibility in how you manage payments and customer data.

Future Payment Usage

The "Future payment usage" setting controls whether and when Stripe saves customers’ payment methods for potential future charges. Note that any future payments using saved methods must be initiated manually from your Stripe dashboard.

You can choose from the following options:

  • Always
    Stripe will always save the customer's payment method for future use, whether they are a registered user or a guest.

  • Registered users only
    Stripe will save payment methods for future use only for users who are registered into your system. Guest users' payment details will not be saved.

  • Never
    Stripe will not save any payment methods for future use. All payments will be treated as one-time transactions requiring full payment details each time.

Customer Association and Saved Payment Methods:

  • When a registered user makes a booking, their Stripe Customer ID is saved to their user profile. This allows consistent use of their saved payment methods for future off-session charges.

  • When a guest makes a booking, Stripe creates a new customer and stores the Stripe Customer ID within the booking itself. These customer records are unique per booking and not linked to a user profile.

Customer Linkage Behavior:

  • If a customer is assigned to the booking, the transaction is associated with the customer's Stripe profile.

  • If no customer is assigned, a new Stripe customer is created and tied to that specific booking.

UI Note:
In the Booking > Transaction History popup, if a Stripe customer exists (either from the user account or stored in the booking), an "Open in Stripe" link will appear below the transaction list. This lets you quickly access the related Stripe customer in your Stripe dashboard.

Payment Capture Method

The "Payment capture method" setting determines when the funds for a payment are actually captured by Stripe after the payment method has been authorized.

You have two options:

  • Automatic (Recommended): This is the recommended setting for most taxi services. When a customer makes a payment (for example, when pre-booking a ride or at the end of a trip through an app), Stripe will automatically attempt to capture the authorized payment immediately. This provides a seamless and immediate transaction process.

  • Manual: Choosing this option means that when a customer pays, their payment method will be authorized, and the funds will be held temporarily. However, the funds will not be automatically captured. You will need to manually confirm and capture the payment through your Stripe dashboard or potentially through your system's integration features at a later time. This option might be useful in specific scenarios, such as:

    • Adjusting Fares: If the final fare is likely to change after authorization due to factors like route changes, tolls, or waiting times, you could authorize an estimated amount and then manually capture the final, adjusted amount.
    • Delayed Charges: In some less common situations for taxi services, you might need to delay the actual charge to the customer.

    Important: For the majority of taxi operations, especially on-demand services, the Automatic capture method is highly recommended as it simplifies the payment process. Manual capture adds complexity and requires a system for tracking and manually capturing authorized payments.

Stripe Customer ID Column

The "Stripe Customer ID" column in the Admin > Users > Customers tab displays the unique Stripe Customer ID associated with each of your registered users (if a Stripe Customer ID has been created for them through past transactions or account linking).

This ID can be helpful for:

  • Identifying Customers in Stripe: You can use this ID to quickly locate a specific customer within your Stripe dashboard.
  • Manual Off-Session Charges: If you need to initiate a manual charge for a registered user through Stripe, you can easily find their corresponding Stripe Customer ID in this column.
  • Troubleshooting: This ID can be useful for debugging payment-related issues for specific customers.

This column provides greater transparency and makes it easier to manage your customer data within the context of your Stripe integration.


Additional Payment Methods in Stripe

Stripe supports a wide range of payment methods across different countries, currencies, and customer preferences. By enabling additional payment methods in your Stripe account, you can offer more flexibility to your customers and potentially increase conversion rates.

These methods are fully integrated into the Stripe payment widget used in EasyTaxiOffice — no further development or setup is required after you activate them in your Stripe dashboard.


Categories of Payment Methods

Stripe organizes payment methods into several key categories:

  • Card Payments
    Widely accepted credit and debit cards such as Visa, Mastercard, American Express, Discover, and others.

  • Digital Wallets
    Allow customers to pay using mobile wallets or online accounts.
    Examples:

    • Apple Pay

    • Google Pay

    • PayPal

    • Alipay

    • Amazon Pay

    • Cash App Pay

    • Revolut Pay
    • WeChat Pay

  • Bank Redirects & Real-time Payments
    Customers are redirected to their bank to complete payment. Popular in Europe and other regions.
    Examples:

    • Przelewy24 (PL)

    • Bancontact (BE)

    • iDEAL (NL)

    • EPS (AT)

    • giropay (DE)

    • Sofort (various EU countries)

  • Bank Debits and Transfers
    Direct withdrawal from a customer’s bank account or manual bank transfers.
    Examples:

    • SEPA Direct Debit (EU)

    • ACH Debit (US)

    • Bacs Direct Debit (UK)

    • FPX (MY)

    • BECS Direct Debit (AU)

  • Buy Now, Pay Later (BNPL)
    Allows customers to pay in installments or defer payment.
    Examples:

    • Klarna

    • Afterpay / Clearpay

    • Affirm (in some regions)

  • Voucher-based and Cash Payments
    Available in certain countries where customers pay using cash-based voucher systems.
    Examples:

    • OXXO (MX)

    • Boleto (BR)


Popular Methods by Region

Here are some of the most commonly used payment methods supported by Stripe:

  • Poland: Przelewy24, BLIK, PayPal, Apple Pay, Google Pay, Visa, Mastercard

  • Germany: giropay, Sofort, SEPA, Klarna

  • Netherlands: iDEAL

  • Belgium: Bancontact

  • USA & Canada: Cards, ACH, Apple Pay, Google Pay, PayPal, Affirm

  • UK: Cards, Bacs, Klarna, PayPal, Apple Pay, Google Pay

Stripe automatically displays only the relevant methods based on the customer's location, currency, and browser/device support.


How to Enable Additional Payment Methods in Stripe

To activate new payment options in your Stripe account:

  1. Log in to your Stripe Dashboard.

  2. Navigate to Settings > Payment methods.

  3. Browse the list of available methods for your country and business type.

  4. Click Turn on next to any method you want to offer.

Once enabled, these payment methods will be automatically included in the Stripe widget embedded in your EasyTaxiOffice booking pages.

No coding required: EasyTaxiOffice automatically supports all Stripe methods you enable in your account.


Check All Available Methods

Stripe supports different payment methods depending on the country, currency, and business type. To see a complete list of options for your region, visit:

https://stripe.com/gb/payments/payment-methods

This page allows you to filter by location and get recommendations tailored to your customer base.


Webhook (Payment notifications)

The webhook is used to receive booking and payment status updates from Stripe and apply them automatically in EasyTaxiOffice. Without a webhook, the system cannot update payment statuses based on Stripe events.

This options are available in your EasyTaxiOffice account:

  1. Log in to your EasyTaxiOffice admin panel.

  2. Go to SettingsPayment methods.

  3. Locate Stripe and click Edit.

Set webhook

Use Set to automatically configure the webhook for the currently selected Stripe mode (Test or Live).
The system uses the correct webhook URL and the secret key for that mode. Once configured, Stripe sends booking and payment status updates to EasyTaxiOffice automatically.

Verify webhook

Use Verify to check whether the webhook is correctly configured.

When you click Verify, the system:

  • checks the webhook configuration in Stripe for the selected mode,

  • verifies that the webhook URL and secret key are correct,

  • displays whether the webhook is valid or not.

If the webhook is missing or invalid, the system shows a warning and prompts you to configure it using Set.

Delete webhook

Use Delete to remove the currently configured webhook for the selected mode. After deletion, Stripe will no longer send booking or payment notifications to EasyTaxiOffice until the webhook is configured again.

Manual webhook setup

The webhook can also be configured manually in the Stripe dashboard.

In the Webhook section of the Stripe payment method settings, copy the Webhook URL using the copy button.
Then, in the Stripe dashboard:

  1. Add a new webhook endpoint using the copied URL.

  2. Subscribe to the event: checkout.session.completed.

After completing the manual setup, return to EasyTaxiOffice and use Verify to confirm that the webhook is configured correctly.

Saving settings without a webhook

When you save the Stripe payment method configuration, the system checks whether the webhook is configured:

  • If the webhook is configured and valid, the settings are saved normally.

  • If the webhook is missing or invalid, the system displays a warning recommending that you configure the webhook, because booking and payment notifications will not be received without it.

Important: If the webhook is not configured or is invalid, payments may still be completed in Stripe, but booking and payment statuses in EasyTaxiOffice may not be updated automatically.

Legacy webhook setup

In case you cannot see webhook section in your admin panel please follow the legacy webhook setup below:

  1. Log in to your EasyTaxiOffice admin panel.
  2. Navigate to Settings and then the Payment methods tab.
  3. Locate the Stripe settings and click Edit.
  4. Disable the option labeled "Strong Customer Authentication (SCA)".
  5. Save the changes.
  6. Re-enable the "Strong Customer Authentication (SCA)" option.
  7. Save the changes again.


How to Remove and Re-establish Webhooks in Stripe?

This guide outlines the steps to remove duplicate webhooks in Stripe and re-establish a fresh connection for your booking confirmation emails.

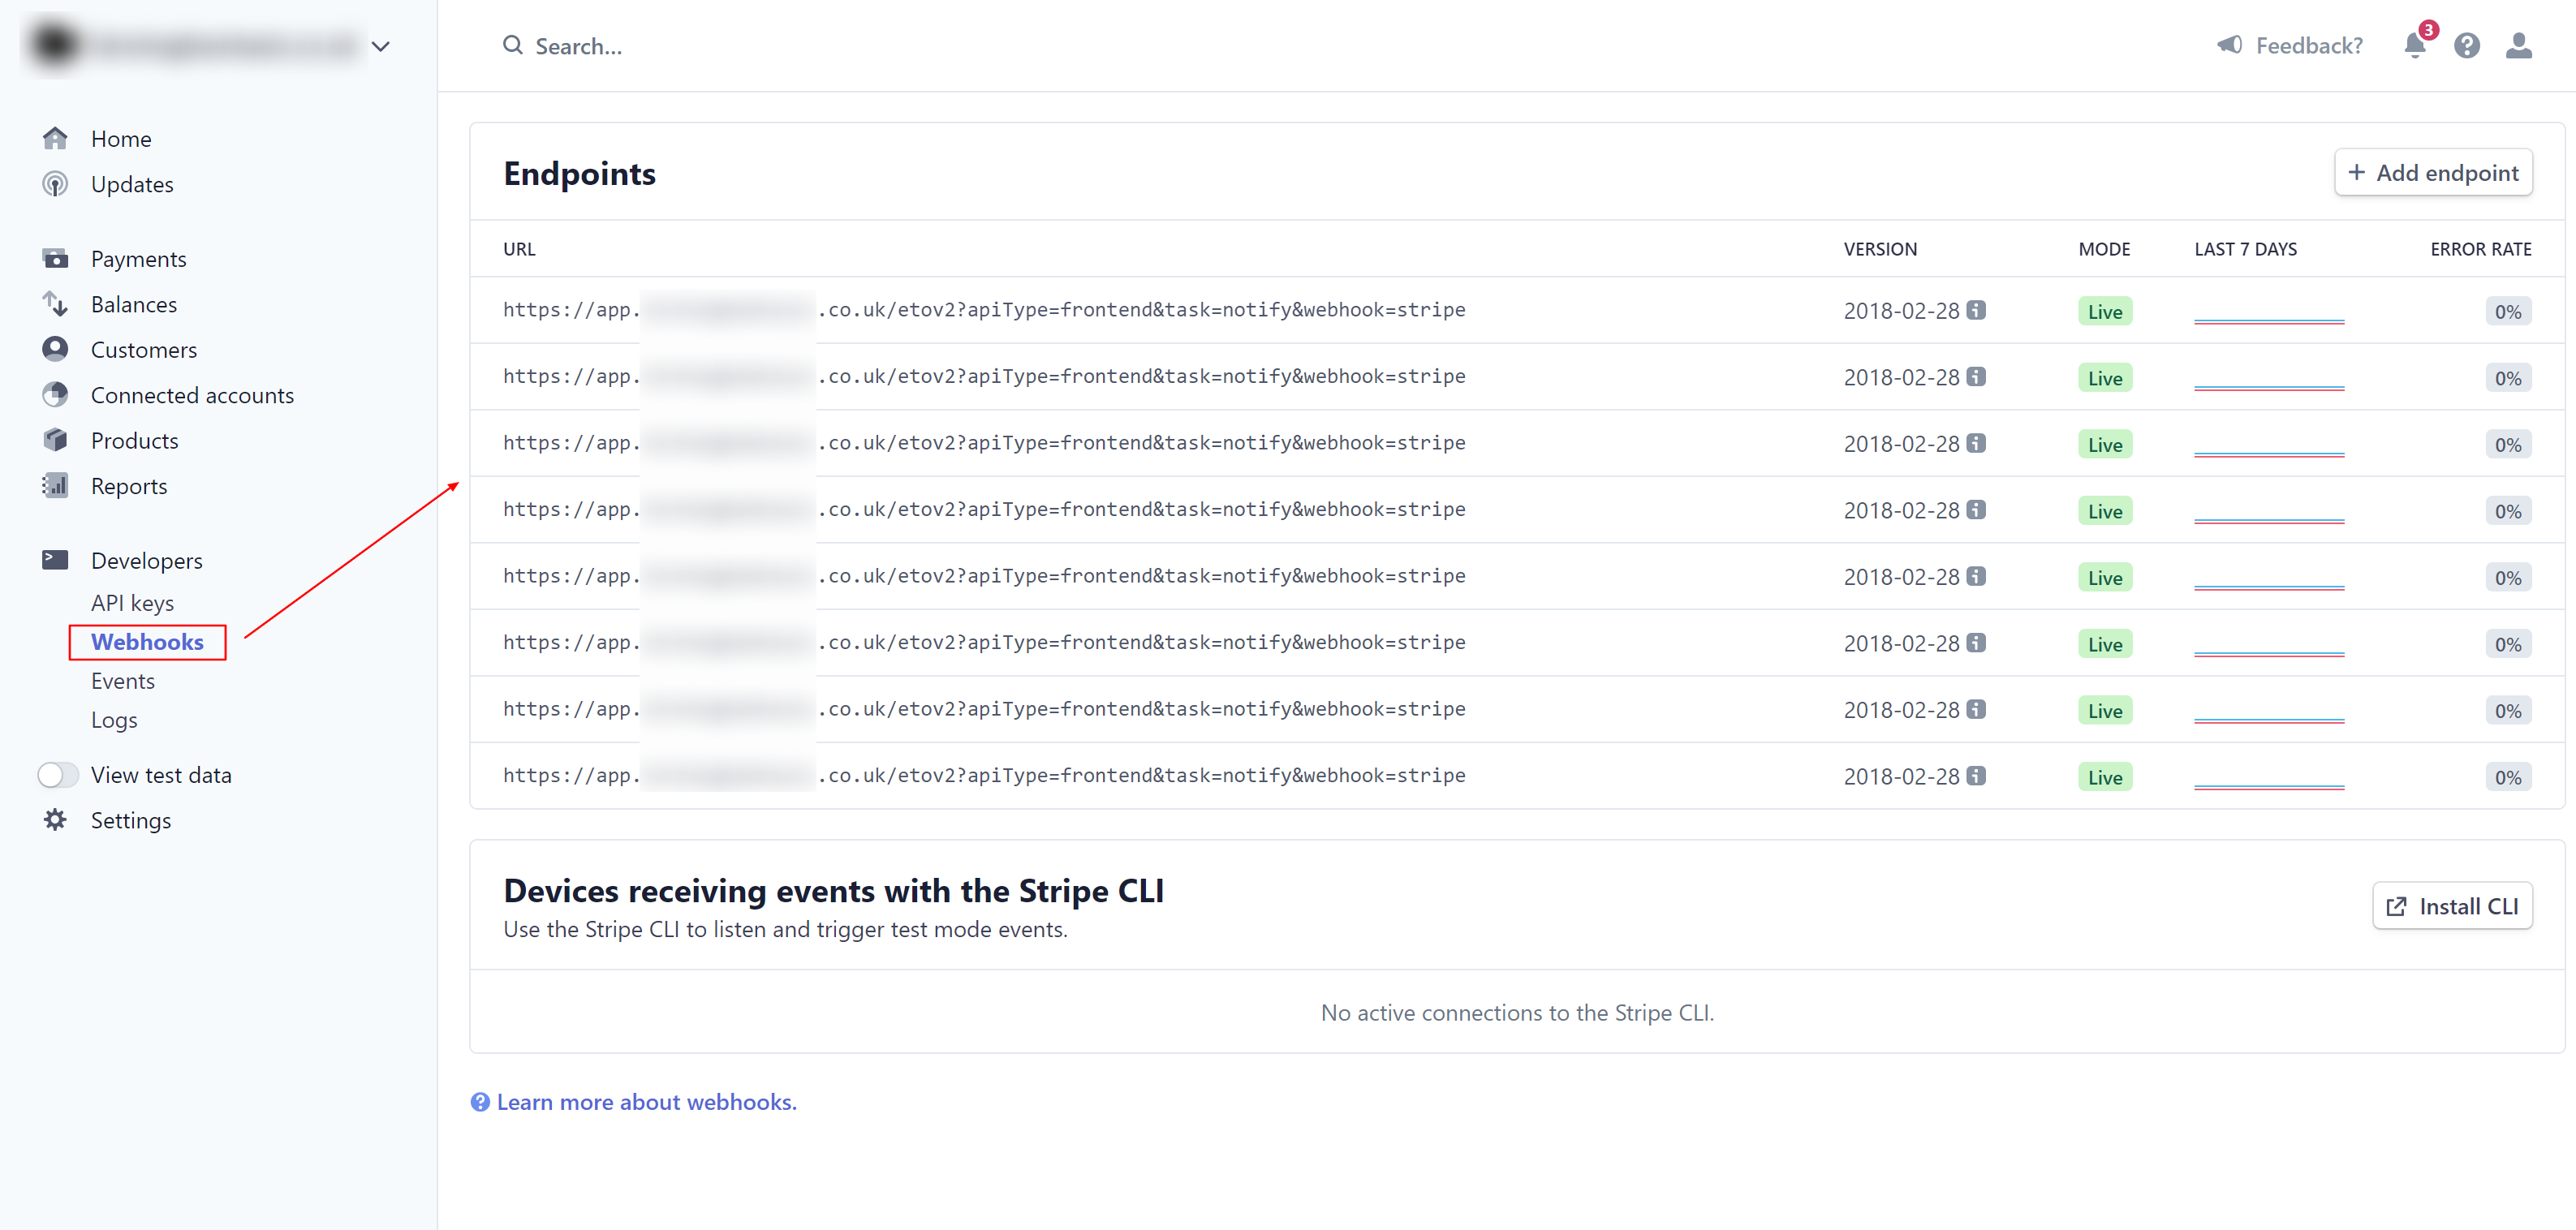
1. Remove Duplicate Webhooks in Stripe:

  1. Log in to your Stripe account.
  2. Navigate to the Developers section and select the Webhooks tab.
  3. Review the listed URLs for any duplicates. These duplicates might be causing multiple email notifications.
  4. Click on a duplicate URL and then click the Delete button to remove it.
  5. Repeat steps 3 and 4 for all identified duplicate URLs.

2. Re-establish Webhook in Admin Panel:

  1. Log in to your EasyTaxiOffice admin panel.
  2. Navigate to Settings and then the Payment methods tab.
  3. Locate the Stripe settings and click Edit.
  4. Follow the instructions described in this online guide, section Webhook (Payment notifications).
  5. Save the changes.

By following these steps, you will remove any duplicate webhooks in Stripe and re-establish a fresh connection using the latest configuration from your admin panel. This should resolve the issue of receiving multiple copies of the same email notification.


FAQs

I do get emails from Stripe about failing web-hook notifications, what to do?

Web-hooks are used to notify booking software about successful payment transaction which makes transaction to be automatically mark as paid in your admin panel. The issue with failing web-hook might arise when the software URL has been changed since the date when web-hook has been set up. To fix this issue please follow the instructions described in this online guide, section Webhook (Payment notifications). This steps above will reset web-hook and make payment notification to work as before.


When I press on Book Now button I see this message “You must provide one of items or sessionId.”,  what to do? 

In case you see this error message please make sure you have correctly copied "Live publishable key" and "Live secret key" from your Stripe account into the payment configuration tab in the admin panel. Please note that for security reasons Stripe displays partially "Live secret key" e.g. "sk__xyz..." which is not valid key. In this case you should generate new "Live secret key". The minimum amount cannot be lower than $0.50 US or equivalent in charge currency.


When I press on Book Now button system is not redirecting to payment page,  what to do?

Please make sure your SSL certificate has been installed correctly and the connection with the software is secured (green padlock).


When making a payment I get this error message “Your card was declined. Your request was in test mode, but used a non test”,  what to do?

This error occurs when you set TEST keys in LIVE mode. Please make sure your Live publishable key and Live secret key are setup correctly.


Admin and Customers are getting too many copies of the same booking confirmation email to their mailbox, what to do?

This can happen when too many webhooks are activated in your Stripe account for the same post-payment notification URL. To resolve this issue, follow the instructions in the "How to remove and reinstall webhooks in Stripe?" section above.