
Here are the available customization options and how to use them.
General settings
These settings affect the layout of the Web Booking Widget and how it works.
Booking with price or without price
The Web Booking Widget can allow different types of bookings: these settings determine if a Passenger will be able to complete a booking online and if the prices will be visible or not.
The admin can choose if the Passengers need to call the company after the initial steps to finalise the booking.
1) Web Booking with Price
This setting allows Passengers to see the calculated price. The admin can set the type of pricing Passengers see. Price options include a combination of the fixed price and distance price or just one of the two (fixed or distance price).
If the payment methods are integrated and activated, then a customer can finalise the booking by making an online payment.
"Book without price if the address cannot be found".
Toggling this setting on will allow an exception for the “Web Booking with Price” setting: the Passenger will be able to complete the booking without a price when the from, to or via addresses cannot be found.
"The price for this journey could not be displayed, but you still can request a quote."
When the Passengers see this message, they can complete the booking process without the price and instead ask the company for a quote.
2) Web Booking without a price
This setting does not allow the Passengers to see a calculated price. Instead, Passengers complete the booking by asking for a quote.
The Passenger receives a confirmation.
The completed booking order appears in the Dispatch Panel. The admin can then set a price for the job. After the admin changes the booking status to “CONFIRMED”, another notification is sent to the Passenger with the requested quote.
*If Passengers want to then cancel the booking, they need to contact the company.
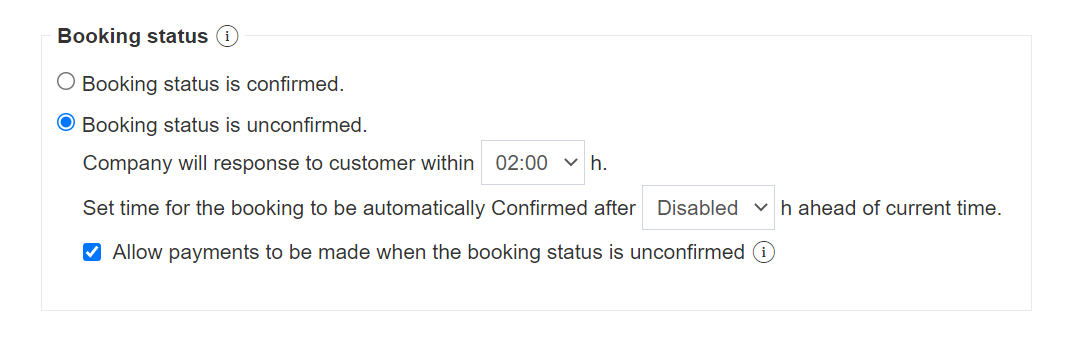
Booking Status
Admins can set if the incoming bookings' status is automatically set to confirmed or unconfirmed.
Afraid you will accept a booking but then have no available drivers to take care of it?
Use "Booking status is unconfirmed" this is a useful option in case company has no capacity to confirm all booking at any given time. The Passengers will receive a confirmation only after the Admin confirms the booking in the panel.
For unconfirmed bookings the admin can set the time in which the company will reply to a customer and decide if an automatic confirmation should happen after a given amount of hours.
Admins can temporarily shut down the possibility of making any bookings via the website by activating Set Web Booking form offline. Users will see a note saying that “The booking form is temporarily unavailable please try again later.” where the booking widget was previously.
Confirm all bookings
Admins can choose if they want all bookings to be automatically confirmed or not.
When choosing bookings to be “unconfirmed”, admins can decide how many hours the company has to respond to a new booking and after what time the booking will be confirmed automatically by the software. Admins can also allow or prohibit payments for unconfirmed bookings.
Step 1 Options
The admin can customize the first step of the booking process.
Display or hide buttons
The admin is able to choose which of these buttons are visible or hidden: the via (add waypoints), return journey, swap address and display current location buttons.
Choose capacity
Admins decide if passengers will be able to choose a required passenger number and luggage amount in the first step. The choices a passenger makes, automatically affect the vehicle availability in step two of the booking process.
[Change type of vehicle - LINK]
Service type
Admins can choose how the different job types are displayed (as different tabs or a dropdown menu) and if the dropdown menu should be hidden if there is only one service type available.
Step 2 Options
The admin can customize the second step of the booking process.
Meet and greet
Admins decide if the meet and greet option is available for passengers at all. Admins can also choose to make meet and greet compulsory.
Display or hide icons
The admin is able to choose which of these icons are visible next to a vehicle box or hidden: passenger, luggage, child seat, boosters seat, infant seat and wheelchair icons.
These depend on type of vehicle
Vehicle display type
The admin can choose how the available vehicles are displayed: either as a horizontal bar or a vertical box.

Map settings
Admins choose if the passengers can see their planned journey route on a map (“Show map”) in step two, should the map be opened by default, what is the zoom level and if the booking summary should be visible on the map or in a separate box.
Step 3 Options
The admin can customize the third step of the booking process.
No-show passengers
Admins can disable the possibility of cash payments for airport pickups as a security measure against no-show passengers.
Guest bookings
Admin can allow or completely prohibit bookings as guests. If not selected, only passengers with created accounts will be able to book.
Booking for someone else
This option allows Passengers to make bookings from their account for other people. Passengers need to provide the other person's personal information.
Member benefits
Admins can use this text field as a marketing tool to inform clients about the benefits of starting an account.
Allow comments
Admin decides if a separate field for client comments and requirements will be visible.
Adding requirements
Admin chooses which information is required for the booking to be completed: contact mobile, full address, pickup and dropoff and additional waypoints, the number of passengers, the amount of luggage, child seats, infant seats or wheelchairs.
Allow only one type of child seat
This option prevents Passengers from adding more than one child seat per car, no matter the type.
Flight details
Admin can decide which flight details will be shown and which will be required for the Passenger to be able to complete the booking.
Adjust pickup times for airports drop offs
This option allows the system to automatically adjust the pickup time by a given number of minutes for bookings that are airport drop offs depending on the plane take off time.
Other Options
Auto add to calendar
When the Passengers receive an email notification with the booking confirmation, the mailbox application saves the date of the journey in the Passengers’ online calendar.
Enable "Powered by EasyTaxiOffice" footer
Adds a small footer on the site.