
Google Ads is used along with conversion events to measure the effectiveness of promotional campaigns. To learn how to integrate it, follow the steps below.
1. Log in to your Google Ads account.
2. Click the "Tools and settings" icon in the top bar, then the "Measurement -> Conversions" button.

3. On the "Summary" page, click the "New conversion action" button.

4. Then create the following conversion actions.
a) On the "Start tracking conversions" page, select "Website".

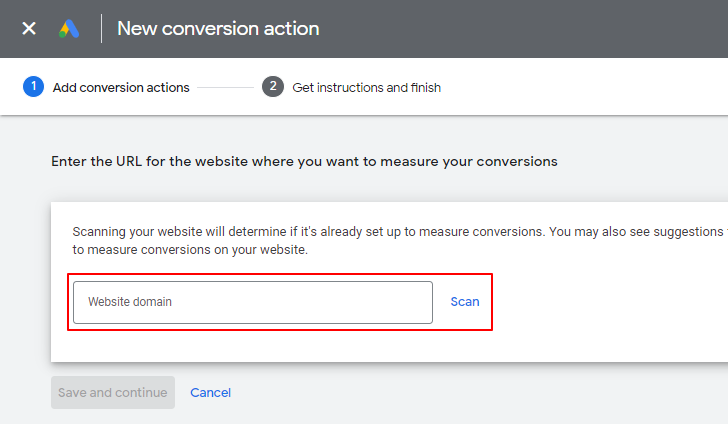
b) On the "Enter the URL for the website where you want to measure your conversions" page, enter your site's URL and click scan.
c) Scroll down and under "Create conversion actions manually using code", click the link "Add a conversion action manually". This step must be repeated for each conversion tracking, see "d)" for more information.

d) On the "Conversion action details" page, enter a configuration that varies depending on the conversion you are creating and click "Done". Configuration details below.

Booking location
Conversion name: Booking location
Goal and action optimisation: Other, Primary action
Value: Don't use a value
Source: Website
Count: Every conversion
Click-through conversion window: 30 days
Engaged-view conversion window: 3 days
View-through conversion window: 1 day
Attribution model: Data-driven
Enhanced conversions: Not configured
Booking vehicles
Conversion name: Booking vehicles
Goal and action optimisation: Other, Primary action
Value: Don't use a value
Source: Website
Count: Every conversion
Click-through conversion window: 30 days
Engaged-view conversion window: 3 days
View-through conversion window: 1 day
Attribution model: Data-driven
Enhanced conversions: Not configured
Booking details
Conversion name: Booking details
Goal and action optimisation: Other, Primary action
Value: Don't use a value
Source: Website
Count: Every conversion
Click-through conversion window: 30 days
Engaged-view conversion window: 3 days
View-through conversion window: 1 day
Attribution model: Data-driven
Enhanced conversions: Not configured
Booking payment
Conversion name: Booking payment
Goal and action optimisation: Other, Primary action
Value: Use different values. If there's no value, use £0.
Source: Website
Count: Every conversion
Click-through conversion window: 30 days
Engaged-view conversion window: 3 days
View-through conversion window: 1 day
Attribution model: Data-driven
Enhanced conversions: Not configured
Booking completed
Conversion name: Booking completed
Goal and action optimisation: Other, Primary action
Value: Use different values. If there's no value, use £0.
Source: Website
Count: Every conversion
Click-through conversion window: 30 days
Engaged-view conversion window: 3 days
View-through conversion window: 1 day
Attribution model: Data-driven
Enhanced conversions: Not configured
Customer register
Conversion name: Customer register
Goal and action optimisation: Other, Primary action
Value: Don't use a value
Source: Website
Count: Every conversion
Click-through conversion window: 30 days
Engaged-view conversion window: 3 days
View-through conversion window: 1 day
Attribution model: Data-driven
Enhanced conversions: Not configured
Customer activation
Conversion name: Customer activation
Goal and action optimisation: Other, Primary action
Value: Don't use a value
Source: Website
Count: Every conversion
Click-through conversion window: 30 days
Engaged-view conversion window: 3 days
View-through conversion window: 1 day
Attribution model: Data-driven
Enhanced conversions: Not configured
Customer login
Conversion name: Customer login
Goal and action optimisation: Other, Primary action
Value: Don't use a value
Source: Website
Count: Every conversion
Click-through conversion window: 30 days
Engaged-view conversion window: 3 days
View-through conversion window: 1 day
Attribution model: Data-driven
Enhanced conversions: Not configured
Customer logout
Conversion name: Customer logout
Goal and action optimisation: Other, Primary action
Value: Don't use a value
Source: Website
Count: Every conversion
Click-through conversion window: 30 days
Engaged-view conversion window: 3 days
View-through conversion window: 1 day
Attribution model: Data-driven
Enhanced conversions: Not configured
e) On the "Create conversion actions manually using code" page, click on the "Save and continue" button.

f) On the next page, click "Use Google Tag Manager" and note the "Conversion ID" and any "Conversion labels" displayed there.

5. Log in to the EasyTaxiOffice admin panel and go to the "Settings -> Google -> Ads" tab and in the "Conversion ID" field enter the conversion ID copied in step 4, followed by the prefix "AW-", you only need to do it once. Then, by ticking the checkboxes, activate the conversion events you want to track and enter a "Conversion Label" for each of them copied in the previous step and save the settings.
6. That's it. For more information, check out this Google online guide.
